
Test and send
When you’re done editing your email you should always test it before sending to your contacts. In this article you’ll learn about:
If you have the Carma add-on Message client test you can also get a preview on how your email looks in different email clients. Read more here.
Preview
On the Test tab of the editor you can find different types of tests you can do before sending your email.
Here you’ll get a preview of your email where you can check your layout, content segmentation and links.
Since the preview hasn’t been generated with recipient data any handlebars or other dynamic content will still show as in the editor, i.e. with placeholders.
Carma unsubscribe links are also dynamic and can’t be tested from the preview. To verify dynamic content you therefor need to send a test email.
If you’ve added content segmentation you can see how it will turn out for different target groups by ticking or unticking the checkboxes for your segments (to the right).
Send test email
It’s important that you test your send out before you send it to your actual recipient list. In that way you can verify that it looks the way you want and that any dynamic content is rendered properly.
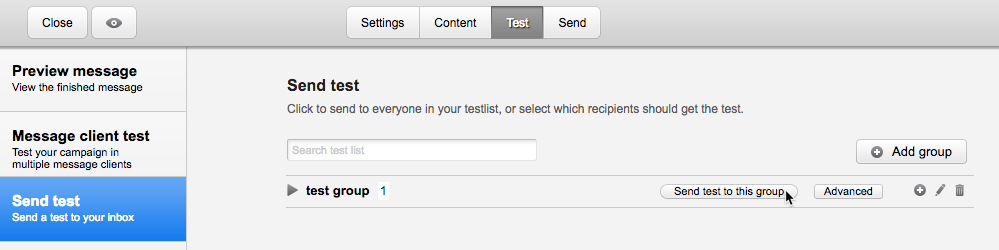
Click on Send test (to the left) and if you haven’t got a test list already you can create a new test group and add yourself. Then you can click Send test to this group.
If you have added a list (and/or project) segment to your sendout, your test recipient will get the test email whether you match the segment or not. This is because you should be able to see and verify your send out anyhow.
But, if you use content segments, your test recipient must match the content segment to receive the specific content. For segments with attribute matches, this is what you need to do:
(1. Add your content segment to your email draft)
2. Click on the arrow next your test group name
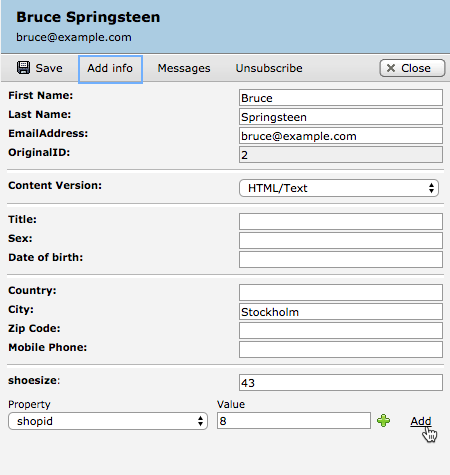
3. Click on the pencil next to your test recipient and your contact card will appear. Now you can update all the Carma standard attributes and if want to set a value in a custom attribute you need to click on Add info in the menu. Then you select the attribute and the value you need to have to match the segment and hit Add and save your settings.
Repeat this if you have several attribute matches in your segment.
You can of course add more test recipients to your test group to match different content segments.
4. And now click Send test to this group. If you’re matching the segment you’ll now receive an email with the segmented content.
Send your email
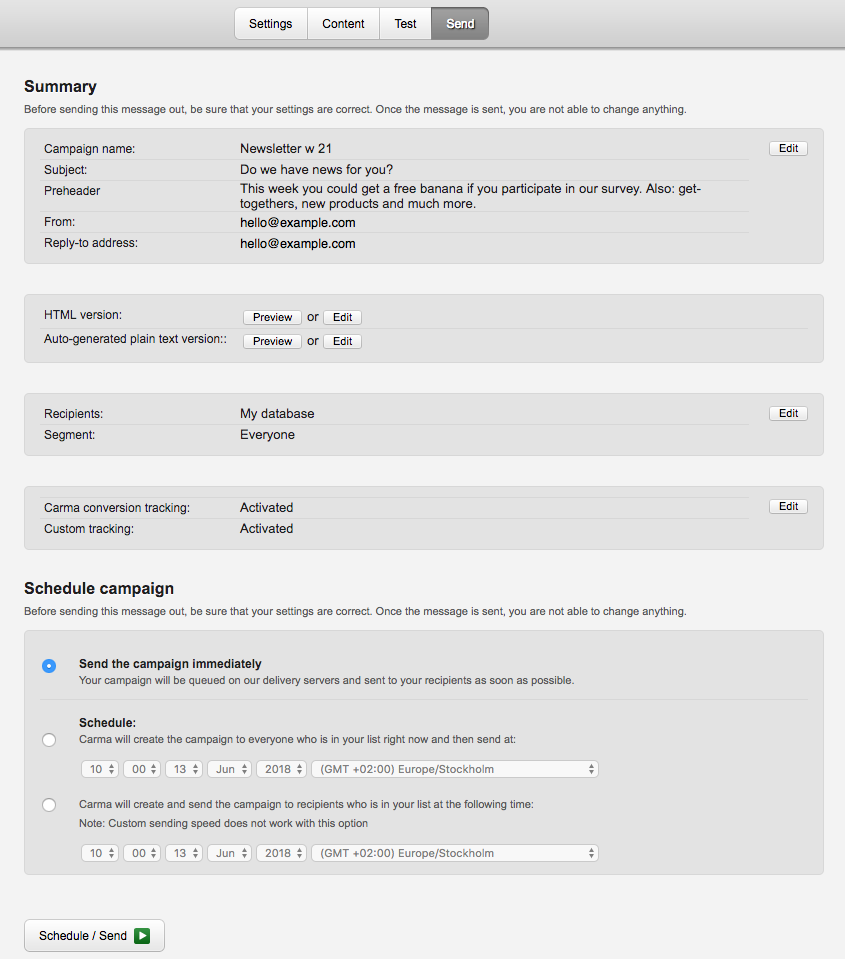
When you’re done testing you can move to the Send tab. Here you’ll get a summary of your settings so you can verify them before send time.
You are able to schedule you email or send it right away.
Send immediately
To send your email right away, just make sure the first send option, Send this campaign immediately, is selected and the hit the Schedule/Send button.
Note that if you’re using Publishing approval you will have a Send to approval button instead. And your email will not be sent until a publisher has approved the email.
Schedule
If you don’t want to send your email right away you can schedule it for later.
For scheduling, you can set the time zone of your scheduling to where you are in the world.
There you have two options for scheduling:
1. The first schedulation is an immidiate generation of your email messages.
Carma will create messages to everyone who is in your list right now (based on the data they have right now) but wait for your scheduled time to send the messages.
By using this option new recipients that enters the list after the message generation (and match the list segment, if any) will not be included in this sendout.
Any recipient data updates from the time you hit Send to the actual scheduled time will not affect the batch. This also means that targeted recipients, that may have opted out from your list after your message generation, will still be included in the batch.
2. The second schedulation is a dealyed generation of your email messages.
Carma will schedule the email but wait with the message generation until your scheduled time.
By using this option any recipient data updates from the time you hit Send to the actual scheduled time will affect the batch. New recipients that enters the list (and match the list segment, if any) from the time you hit Send to your scheduled time will be included in this sendout. Also, targeted recipients can opt out from your list until your scheduled time and will not be included in the batch.
Cancel scheduled email
You can cancel your scheduled email if you want. Simply go to Email > Scheduled and click on the Option button and select Cancel.
Then the email will move back to your drafts and you will be able to edit it as a regular draft again. After that you can scheduled it again or just send it right away.