
Attribute tags/handlebars
You can use attribute tags and or handlebars in the email content and in link URL to customize the content per recipient and to adjust the landing page with the data tied to each and every recipient.
The most common one probably is: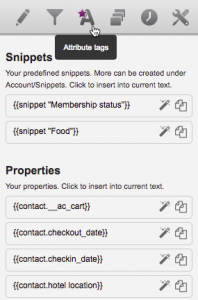
!!First_Name!! or written as a handlebar {{contact.firstName}}
will grab any “firstname” data from the recipients into the email where you have added the actual tag/handlebar.
When you’re editing your content you’ll find all your available handlebars in the inspector by clicking A. You can then copy or click the magic wand to add the handlebar to your content.
The attribute tags are slightly older and therefore have more Carma UI administration possibilities whereas handlebars is a more open and “free” technique that in it self offers great many coding possibilities and therefore appeal more to your own skills.
So, for example, when using an attribute tag connected to a date value, like;
!!DateOfBirth!!
you will get the whole string into the email content as it is written in the database (probably like: YYYY-MM-DD)
example: 1974-01-10
whereas by using a handlebar, for example;
{{contact.dateOfBirth}}
you also have the possibilities to format it more, if you know how to code it, such as:
{{date ‘DD-MM-YY’ contact.dateOfBirth}}
example: 10-01-74
Just one of many example of what you can do with the two different techniques of course, but you can read more of the two different ways below and get inspired by examples too.
As you probably have figured out by now using more complex handlebars in your email content will cause a lot of code content which may make it harder to get your head around how the actual design and content will appear after the send out – when the handlebars and all its code have done its job, so to speak..
To ease up on those effects you can use “snippets” to store all the actual handlebar code in, and just add the snippet into the actual content instead.
Lets say you have a handlebar that compares many different values that your recipients may have, it will quickly escalate to a lot of code in the actual email block content.
In below example, the handlebar code are looking for different values in recipient property: “product_title_code” and depending on which one of the different potential values such as: “iP” or “AN” or “Wi” or “HTC” you have as a recipient, you will get a corresponding rendered value in your email content. In below case, info of what charger that suits your phone brand.
(and as you can see it can get quite messy and hard to imagine how the actual content will look per recipient)
{{#switch contact.product_title_code}}{{#compare “==” ‘iP’}}apple iPhone charger{{/compare}}{{#compare “==” ‘AN’}}android phone charger{{/compare}}{{#compare “==” ‘Wi’}}Windows phone charger{{/compare}}{{#compare “==” ‘HTC’}}HTC phone charger{{/compare}}{{/default}}{{/switch}}
So, if you instead add above code chunk in a snippet, it will simply be the snippet name added into the email block content:
{{snippet ‘snippetname’}}