
Template configuration
With Template configuration account administrators can manage default content and styling for all your templates from account settings.
The configuration is mainly for basic styling, header and footer information but can also be customized for other elements in your templates.
The configuration will help you to quickly update i.e. the logo in all your sendouts at the same time. Any changes to your configuration will update all your templates, drafts, autosends and transactionals immediately.
The purpose of the Template configuration is to make it easy for you to keep all your templates, messages and pages up to date. And give the account administrators more control over the actual basic content.
Requirements
The template configuration is applicable on all templates corresponding to the configuration parameters. All Carma default templates are equipped with these parameters but customized templates can also correspond to the settings. Contact our support if you are unsure.
For page templates you must use the page theme “Theme from Template Configuration” in order to use the styling configuration.
Only Carma account administrators can edit the default settings.
The basics
Go to Account settings > Template Configuration.
From here you can edit your configuration content, such as logos, colors, buttons, fonts and footer information. You can edit on account level, but also choose a specific project.
In the dropdown menu to the left you select the level for your configuration. To edit your default settings on account level make sure you’ve selected “Account settings” in the dropdown.
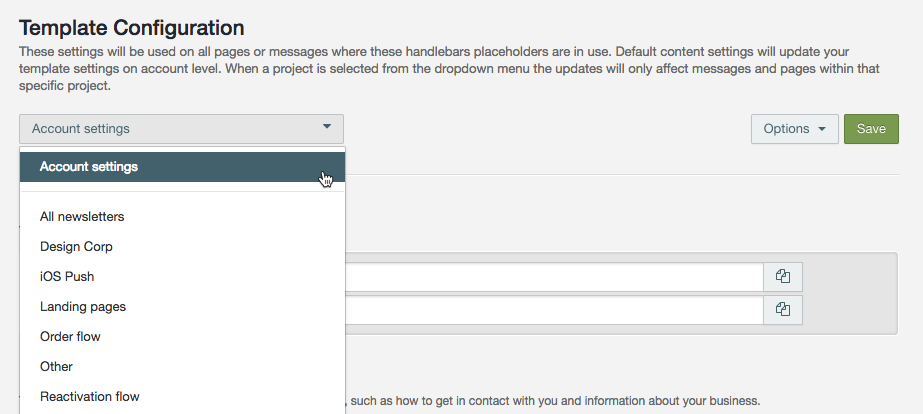
When you want to edit the configuration for a specific project you simply choose the project in the dropdown.
Project level is useful if you want to for example have different logos for different countries or brands, or default texts in different languages.
Note that projects without any specific configuration will use the settings on account level.
We recommend that you start focusing on setting up your account level configuration and then continue to project level if wanted.
When you save your configuration, the settings are immediately rolled out to all of your corresponding templates, drafts, automatic sendouts and pages.
Next to the Save button you find an Options menu.
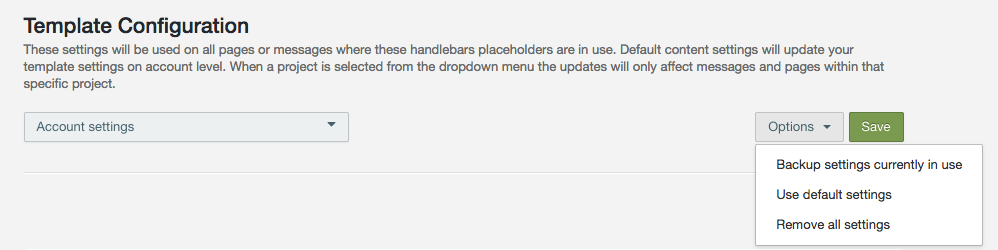
From this menu you can:
- Backup settings currently in use – this will provide you with a file containing the raw data for your latest saved configuration on the selected level (account or project).
The raw data can be pasted at the bottom of the configuration page to restore the backed up version. - Use default settings – this option will clear your customized configuration and instead use the Carma default configuration.
- Remove all settings – this option will leave all configurations empty. (Only available on account settings level.) Or…
- Remove Project overrides – this option will clear all project specific configurations and use the configurations on account level. (Only available on project level.)
Affected content and styling
So, what type of content and styling can be configured?
Basics
The basic settings are only included as default in the templates for the Print channel but can of course also be included in all other channels as well.
Here you add your home page and your organization number.
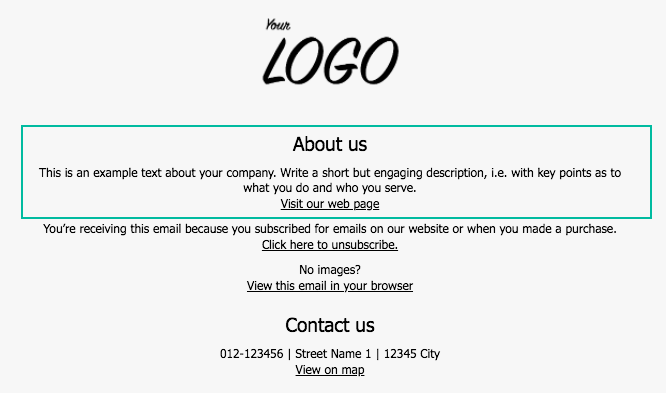
Informational content
The content configurations are suitable for footer information, such as how to get in contact with you and information about your business.
Your email disclaimer text that should describe why your recipients are receiving your emails.
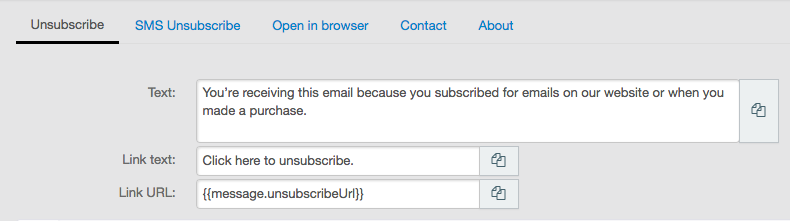
The configuration parameters are:
- Text – Informational text i.e. about why your recipients are receiving your emails
- Link text – Unsubscribe link text (will automatically be linked to the Link URL)
- Link URL – The URL or Carma handlebar that will take your recipients to your unsubscribe page (will automatically connect to your Link text).
By using {{message.unsubscribeUrl}} the settings on your projects will be used, e.g. you don’t need to update your template configurations on project level to continue using your project unsubscribe settings.
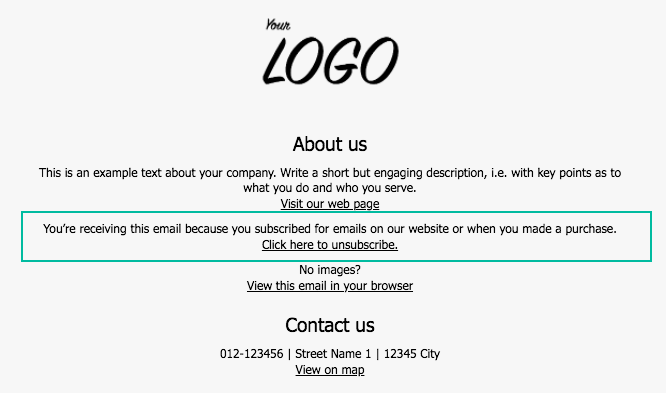
The corresponding text in your emails:
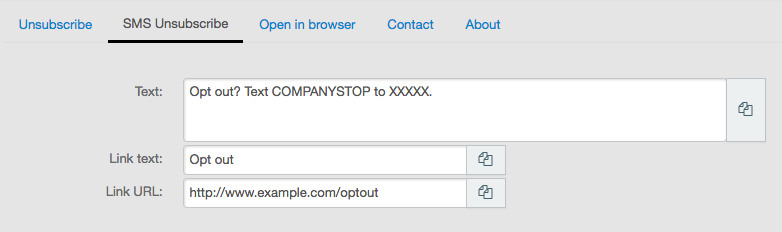
By adding your SMS Unscubscribe text to your configuration you can easily add it to your SMS content.
The configuration parameters are:
- Text – Edit your SMS opt out text with your custom keyword and inbox number
- Link text – If SMS opt out is managed from a web page, add the link text…
- Link URL – … and the URL to your web page.
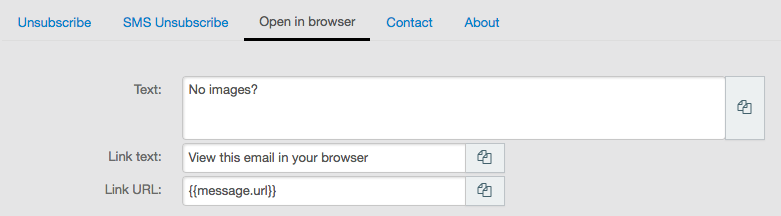
This is the text for viewing the email in the browser.
The configuration parameters are:
- Text – paragraph where you i.e. can describe the issue.
- Link text – the linked text for opening the message in the browser (will automatically be linked to the Link URL)
- Link URL – handlebar which creates the browser content (will automatically connect to your Link text). Note: no edit is recommended!
The corresponding text in your emails:

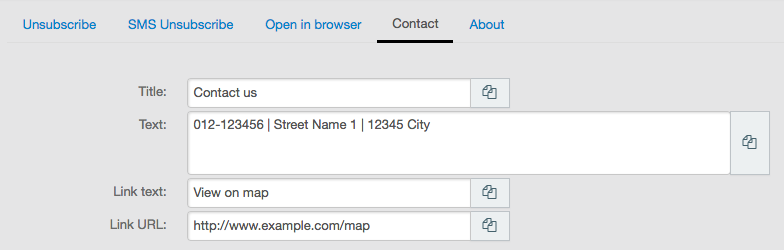
The configuration parameters are:
- Title – header, i.e. Contact us, Customer support, etc.
- Text – paragraph with contact information.
- Link text – link where you can guide your recipients to i.e. your website (will automatically be linked to the Link URL)
- Link URL – the url to i.e. your website (will automatically connect to your Link text)
The corresponding text in your emails:
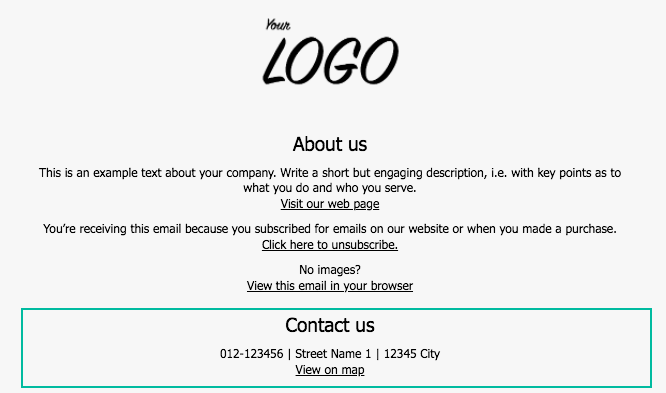
The configuration parameters are:
- Title – header, i.e. About us, your company name, etc.
- Text – paragraph where you i.e. describe your business and purpose.
- Link text – text where you can guide your recipients to i.e. your website (will automatically be linked to the Link URL)
- Link URL – the url to i.e. your website (will automatically connect to your Link text)
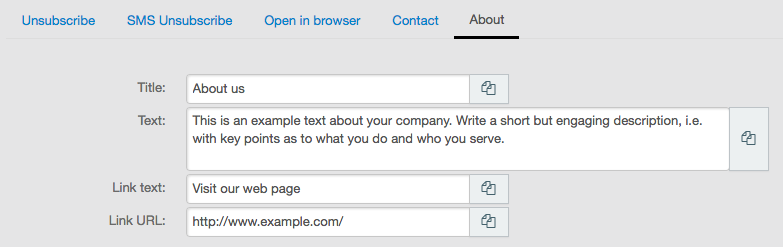
The corresponding text in your emails:
Theme
Customize your different templates according to your colors, fonts, logos and social media icons.
You can also upload external stylesheets. Please note: changes might not apply to all of your sendouts.
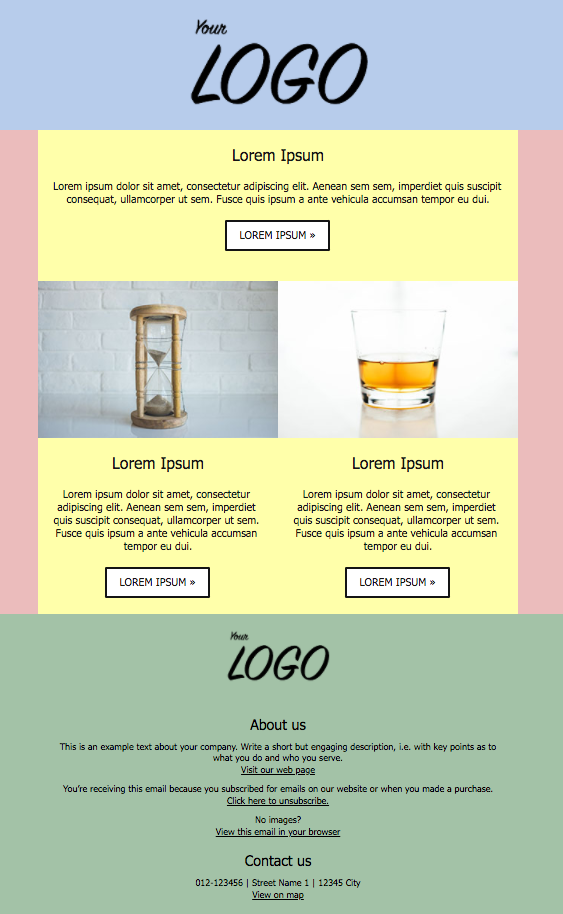
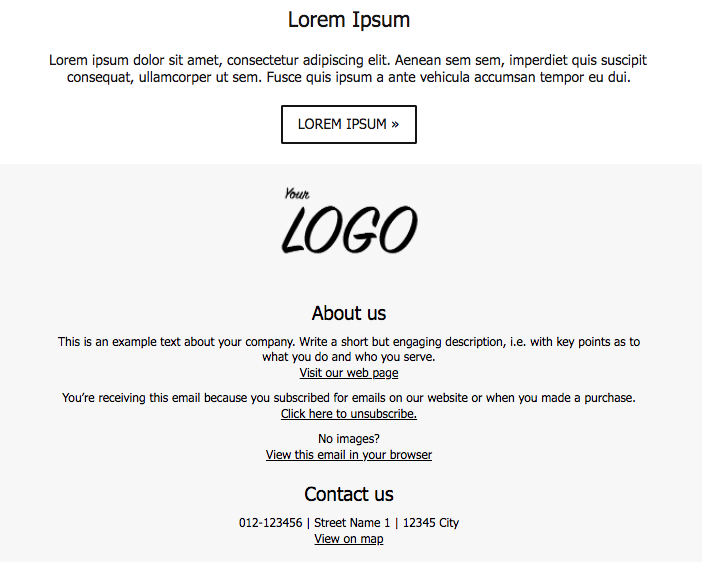
The right image shows the different sections of a template.
Blue – header section
Pink – body section
Yellow – content section
Green – footer section
The different sections include different type of configurations. Read more on each section below.
Here you can edit your background color and add a stylesheet for your pages.
If you have minor CSS adjustements to your page templates you can add these on Page CSS.
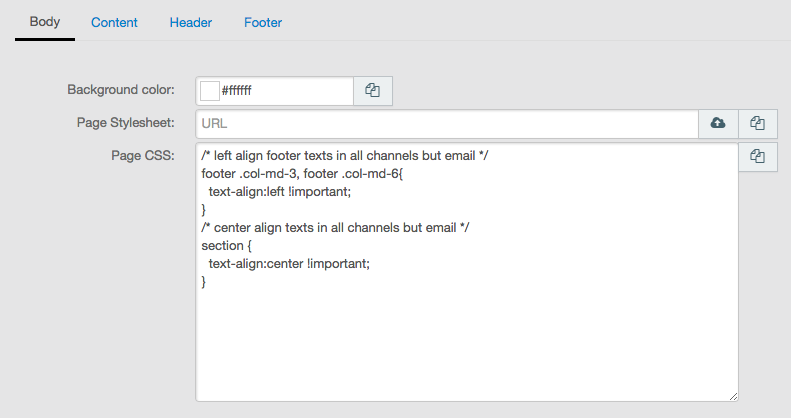
Here you can edit the background color for the content section (the color behind your articles).
You can also edit the font, text size and styling for your paragraphs and your buttons.
Regarding fonts, our recommendation is that you use websafe fonts, e.g. fonts that have full support in all email clients (read more on w3schools). However, you can use other fonts aswell but if so make sure you always include one fallback font.
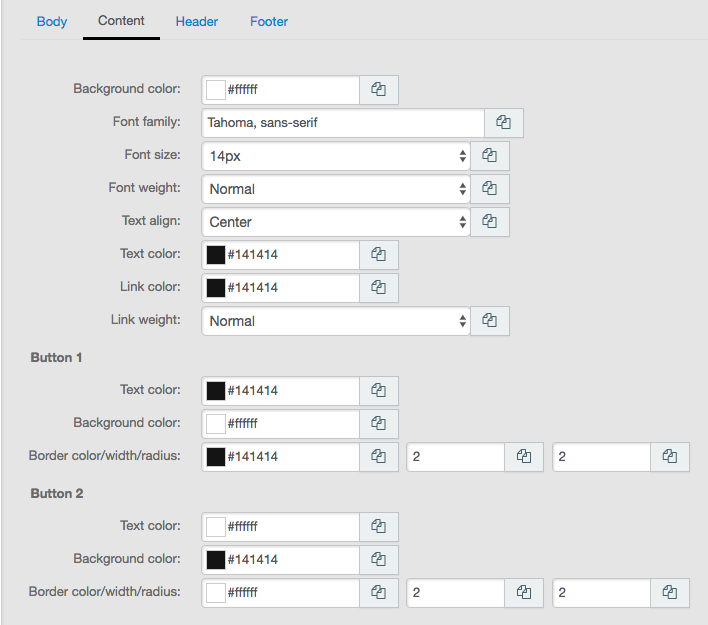
The output of above settings in an email would be:
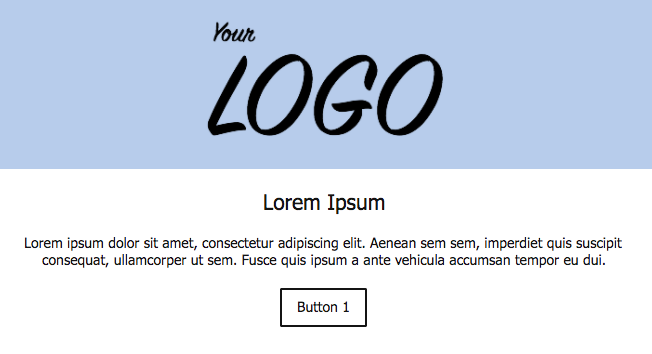
In the Theme header you can style and add content to your header section in your templates. The header is the top section of your templates and where you normally place your logo.
You can also edit the font, text size and styling for your header text (if any).

Logo
To manage the header logo you can use these parameters:
- Image URL – where Carma finds the image, upload you logo by clicking the cloud icon. You can preview your current image by clicking the eye icon.
- Image dimensions – If you want to set the width or height for your image you need to write the wanted pixels in the boxes. Otherwise, leave them empty.
- Title – the image title
- Link URL – add the URL to i.e. your home page to make your image clickable.
- Alignment – set the horizontal alignment of your logo (for your email templates).
In the image below the header background is blue and below is the content section which is white.
In the Theme footer you can style and add content to your footer section in your templates. The footer is the bottom section of your templates and where you normally place your informational content (read more above).
In our default email templates you can include social media icons in your footer (read more below).
You can edit the font, text size and styling for your footer text.
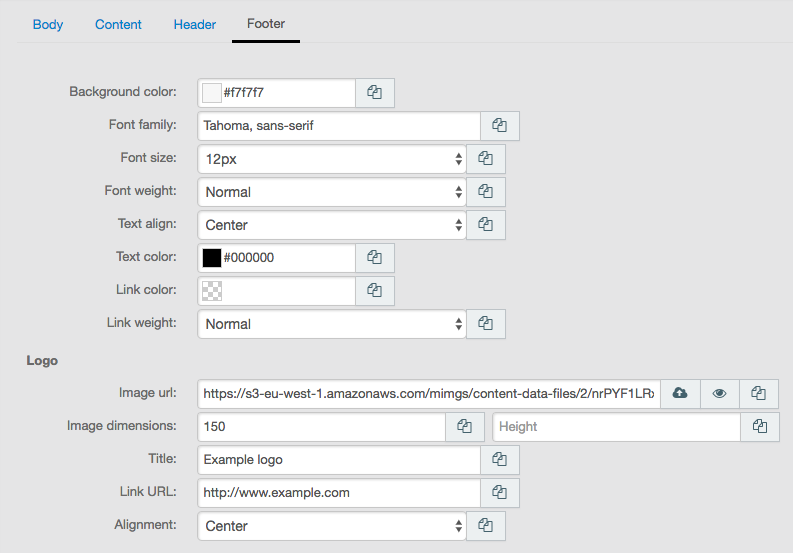
Logo
The footer logo can be the same as the header logo (if so, just upload the same image) or you can use some other logo here.
To manage the footer logo you can use these parameters:
- Image URL – where Carma finds the image, upload you logo by clicking the cloud icon. You can preview your current image by clicking the eye icon.
- Image dimensions – If you want to set the width or height for your image you need to write the wanted pixels in the boxes. Otherwise, leave them empty.
- Title – the image title
- Link URL – add the URL to i.e. your home page to make your image clickable.
- Alignment – set the horizontal alignment of your logo (for your email templates).
In the image below the footer background is light grey and above you see the content section which is white.
The text content is the content you’ve added in your informational content (read more above)
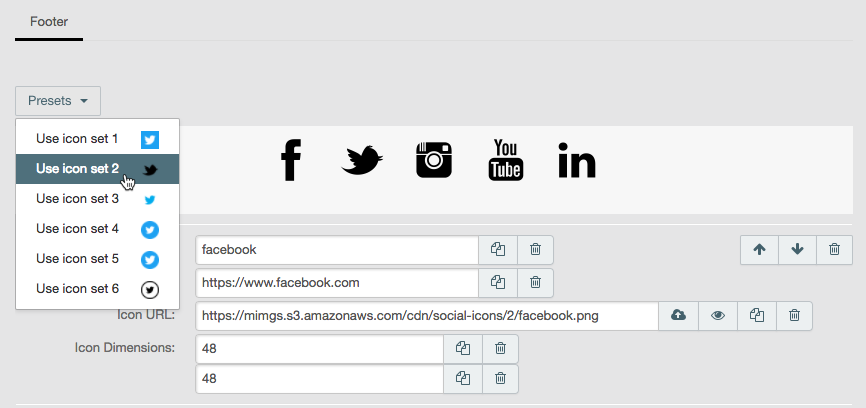
Social media
You can add default social media icons och links to your footer. Choose one of the presets from the dropdown and use them as they are or modify them.
To manage the social media icons you can use these parameters:
- Title – the title of your icon
- Link URL – add the URL to your social media page
- Icon URL – where Carma finds the image, upload you logo by clicking the cloud icon. You can preview your current image by clicking the eye icon.
- Icon dimensions – If you want to set the width or height for your icons you need to write the wanted pixels in the boxes. Otherwise, leave them empty.
Head elements/Scripts
The contents of this config parameter will be put last in the page element. You can include any elements (i.e meta, script, link, style), but be sure to check that the included libraries are compatible with existing libraries. Pages always have font-awesome 4, jquery 1.12+ and bootstrap 3 included by default.
Config Data
Here you can view and edit the raw data for your configurations.
If you have a saved backup of a previous configuration that you want to use instead of your current, you can paste the raw data here and hit save.
You can also customize your own parameters and add to the configuration.
Editing a template containing configuration parameters
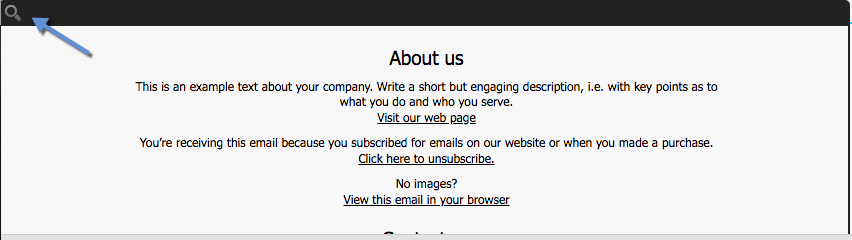
Template blocks containing configurations are not editable by default. And, if set up properly, you shouldn’t need to edit the configurated content at all when i.e. sending an email.
You can however unlock the block to add other content. To unlock a block, you hover it and click on the magnifier glass in the upper left.
And then uncheck “Lock this block” in the inspector.
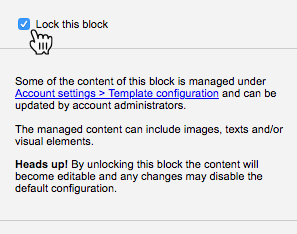
When unlocking the configuration handlebar for the section will be revealed, i.e.:
{{{config.data.templates.pageFooter}}}
Heads up! Any changes to a handlebar may disable the connection to its configuration content.
You can delete handlebars you don’t want to include in i.e. your footer section. Or of course move them within the block. If you have deleted a handlebar and want to replace it. You can copy the handlebar from Account settings > Template configuration or start over with a new block containing the default setup (and delete your old block).

Copy handlebar from Account settings > Template configuration
After you’ve edited a block containing configurations you need to lock the block in order to view the content with configurations.